Piwigo Install - Ubuntu 22.04

Piwigo Install - Ubuntu 22.04
Piwigo is open source photo management software. Manage, organize and share your photo easily on the web. Designed for organisations, teams and individuals.
Install LAMP Server
Follow the LAMP install here.
Install PHP
Install PHP extenstions:
1
$ sudo apt install libapache2-mod-php php-common php-intl php-mysql php-gd php-xml php-ldap php-zip php-mbstring php-xmlrpc php-cli php-curl unzip
Edit php.ini file:
1
sudo nano /etc/php/8.1/apache/php.ini
Modify the following lines:
1
2
3
4
memory_limit = 256M
upload_max_filesize = 100M
post_max_size = 100M
date.timezone = Europe/Lisbon
Restart Apache:
1
sudo systemctl restart apache2
Create Piwigo Database
Log in to MariaDB:
1
sudo mysql -u root -p
Create the database:
1
2
3
4
5
CREATE DATABASE piwigo_db;
CREATE USER  'piwigo_user'@'localhost' IDENTIFIED BY 'myP@ssword';
GRANT ALL ON piwigo_db.* TO  'piwigo_user'@'localhost' IDENTIFIED BY 'myP@ssword' WITH GRANT OPTION;
FLUSH PRIVILEGES;
EXIT;
Install Piwigo
Download the latest version:
1
curl -o piwigo.zip http://piwigo.org/download/dlcounter.php?code=latest
Unzip Piwigo:
1
sudo unzip piwigo.zip
Copy the files to the web server directory:
1
2
cd piwigo
sudo cp -R * /var/www/html/
Set the correct permission and owner for the files:
1
2
sudo chown -R www-data:www-data /var/www/html/
sudo chmod -R 755 /var/www/html/
Create Apache Virtualhost File for Piwigo
Edit the existing default virtaulhost file:
1
sudo nano /etc/apache2/sites-available/000-default.conf
Erase the existing and replace with the following:
1
2
3
4
5
6
7
8
9
10
11
12
13
14
15
<VirtualHost *:80>
ServerAdmin <Your_Email_Address>
DocumentRoot /var/www/html/
ServerName <Your_Server_FQDN or Server_IP>

<Directory /var/www/html/>
Options +FollowSymlinks
AllowOverride All
Require all granted
</Directory>

ErrorLog ${APACHE_LOG_DIR}/error.log
CustomLog ${APACHE_LOG_DIR}/access.log combined

</VirtualHost>
Complete Installation of Piwigo
Using your browser of choice, go to the ip address or FQDN of your server:
1
http://192.168.x.x or http://piwigo.example.com
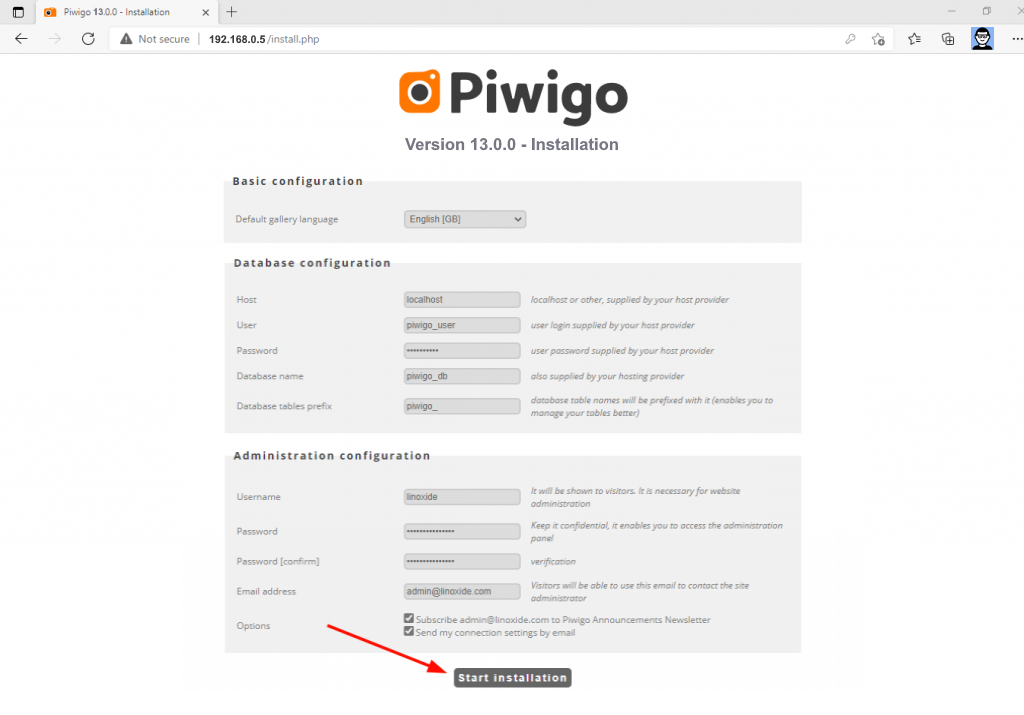
Fill out the database details that you created under Create Piwigo Database. Then fill out your admin details and click Start Installation.
This post is licensed under
CC BY 4.0
by the author.